-
 HTML5 Course 1 × $40.00
 -
 JS
ES6 Course 1 × $99.00
JS
ES6 Course 1 × $99.00 -
 PHP
Course 1 × $56.00
PHP
Course 1 × $56.00 -
 Python Course 1 × $23.00
 -
 WordPress Course 1 × $100.00
Subtotal: $318.00
HTML5 Course 1 × $40.00JS
ES6 Course 1 × $99.00PHP
Course 1 × $56.00Python Course 1 × $23.00WordPress Course 1 × $100.00Subtotal: $318.00

Installing MongoDB on Windows -- MongoDB is a popular NoSQL database that provides a flexible and scalable solution for managing data. If you're looking to install MongoDB on your Windows or Mac machine, this step-by-step guide will walk you through the installation process with accompanying photos to make it easier for you.
Step 1: Download MongoDB
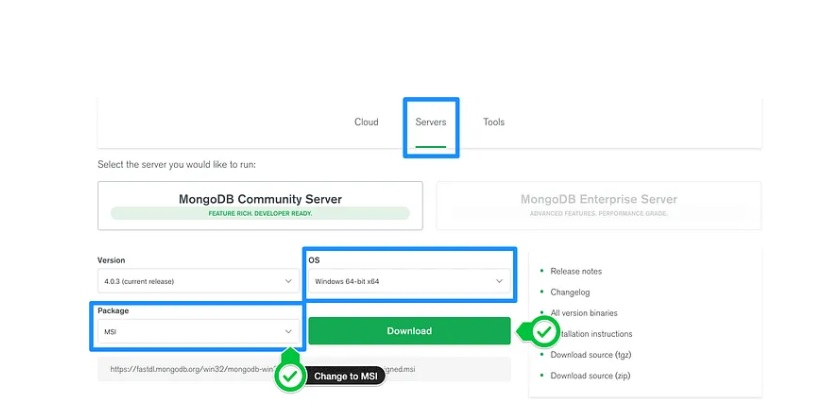
Visit the official MongoDB website at https://www.mongodb.com/try/download/community.
Scroll down to the "Community Server" section and click on the "Download" button for the Windows version.
Step 2: Run the Installer
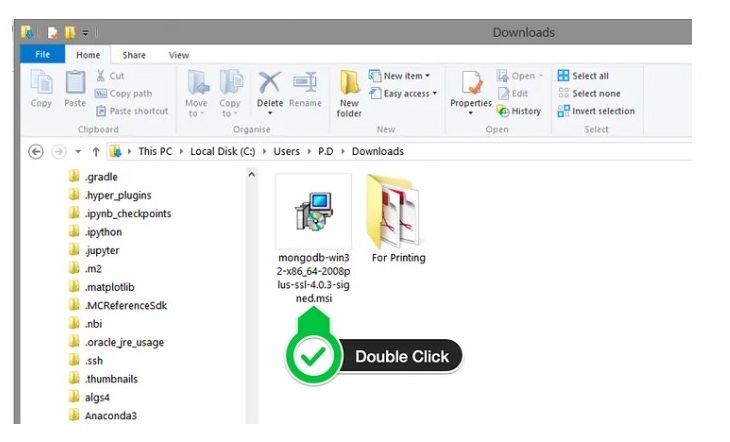
Locate the downloaded MongoDB installer file (.msi) and double-click on it to run the installer.
If prompted by User Account Control, click "Yes" to allow the installer to make changes to your device.

Step 3: Choose Setup Type
In the MongoDB Setup Wizard, select the setup type you prefer (Complete or Custom). For most users, the "Complete" option is recommended.
Click "Next" to proceed.
Step 4: Install MongoDB
Select the destination folder where MongoDB will be installed or keep the default location.
Click "Next" to begin the installation process.
Step 5: Start MongoDB Compass (Optional)
MongoDB Compass is a graphical interface for managing MongoDB databases. You can choose to install it or uncheck the box if you prefer not to install it at this time.
Click "Next" to continue.
Step 6: Install MongoDB as a Service
If you want MongoDB to run as a Windows service, check the box and provide a Service Name or keep the default name.
Click "Install" to start the installation process.
Step 7: Complete the Installation
Wait for the installation process to finish. Once completed, you will see the "Completing the MongoDB Setup Wizard" screen.
Check the box that says "Run MongoDB Compass" if you want to start Compass immediately.
Click "Finish" to exit the installer.
Congratulations! MongoDB is now installed on your Windows machine.